Accountability Chart Guide
The Accountability Chart is a visual tool that defines your organization’s structure, roles, and responsibilities. Use the Accountability Chart to clearly assign responsibilities, identify gaps, and ensure the right people are in the right seats to drive your business forward.

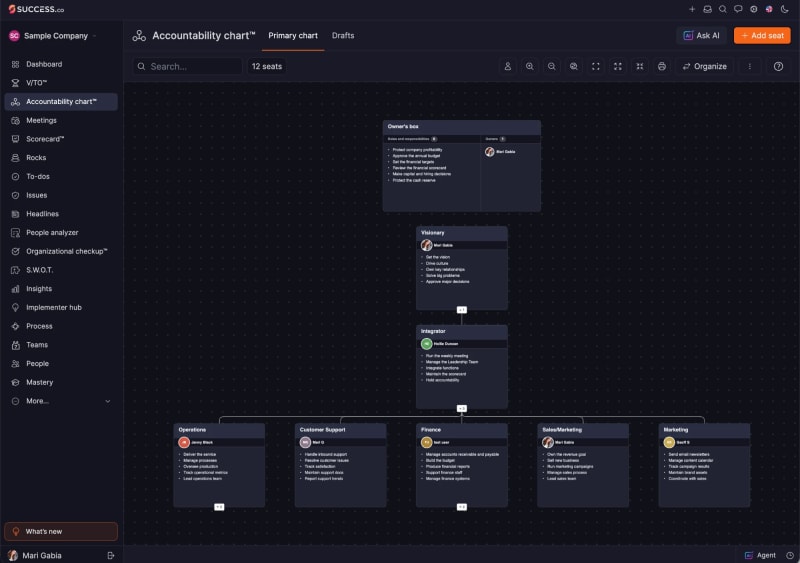
You can access the Accountability Chart from the sidebar and you can choose to view either the Primary Chart or Drafts tab from the top.
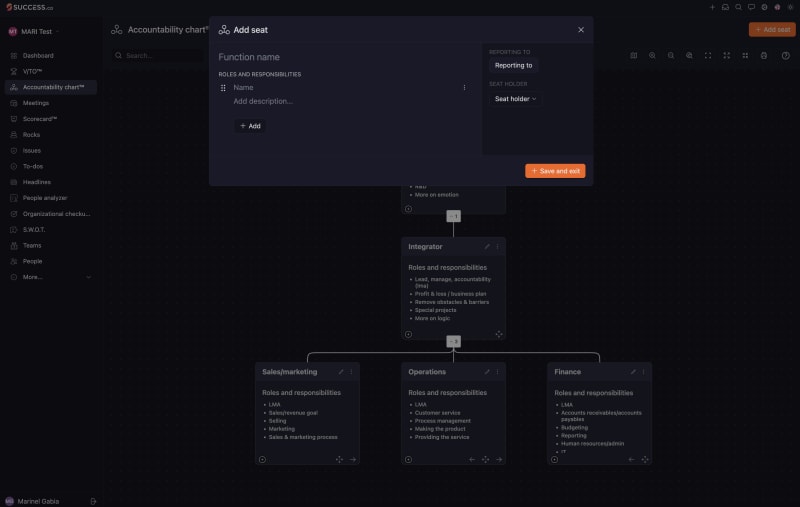
Add seat
Adding a Seat in the Accountability Chart for the first time.
- Click the Add Seat button; a pop-up window will appear.
- Enter the Function Name.
- Under Roles and Responsibilities, add the name and description of the role’s responsibilities.
- Click the + Add button to add more roles and responsibilities.
- Use the three-dot icon next to each role or responsibility to delete.
- Select the Seat Holder dropdown to assign an owner to the seat.
- Click the Save and Exit button to save the seat.
If you want to assign a seat to someone who is not a user in Success.co, select the Seat Holder dropdown, enter a name in the Add placeholder box at the bottom of the dropdown, and click the + sign next to it to save the holder name.

If you want to add a new user and assign them a seat, select the Add new holder button and a pop-up window will appear. This is the same method as if you add a new user from People section, and this new user will be added into the People section. If the new user is assigned a permission level of Owner, Admin, Manager or Team Member this will be a paid seat.


Owner's box
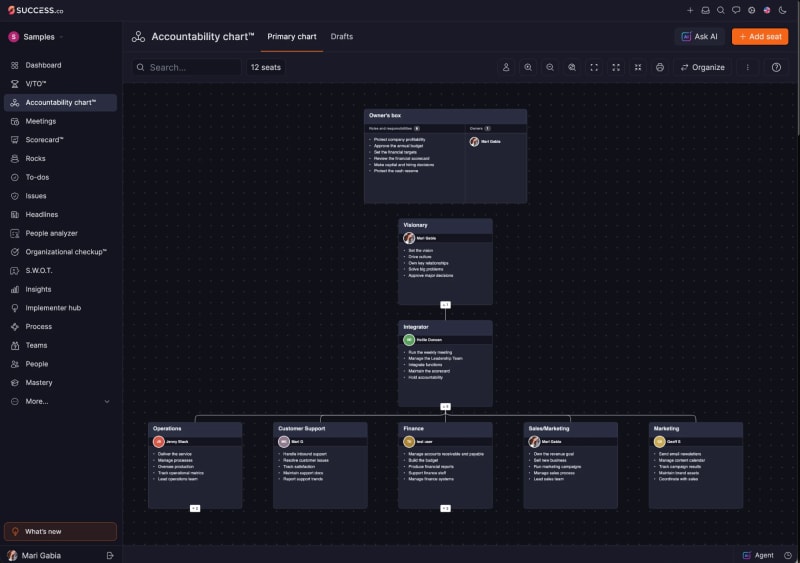
The Owner's box sits at the top of your Accountability Chart, above the Visionary. Use it to show the company's owners and what they're responsible for, such as approving the annual budget or making capital decisions.
Add an owner's box
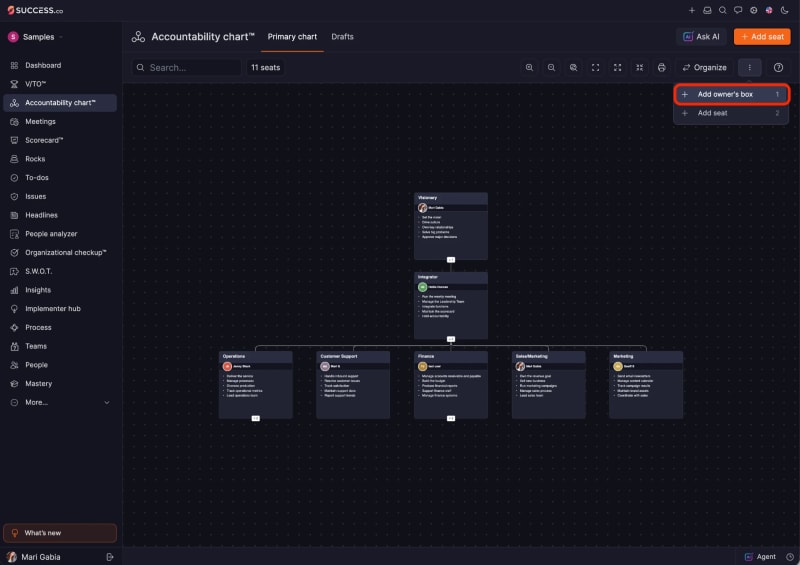
- Click the three-dot icon in the toolbar at the top of the chart.
- Select + Add owner's box.
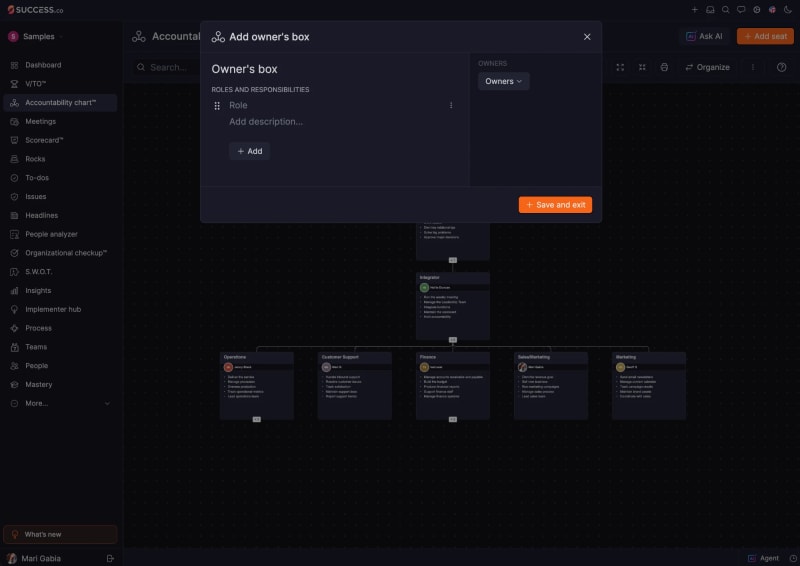
- In the Add owner's box window, under Roles and Responsibilities, enter the name and description of each responsibility.
- Click + Add to add more roles and responsibilities.
- Select the Owners dropdown and choose the owners. You can choose more than one.
- Click Save and exit.
The Owner's box now appears at the top of the chart, with its roles and responsibilities on the left and its owners on the right.
Show or hide the owner's box
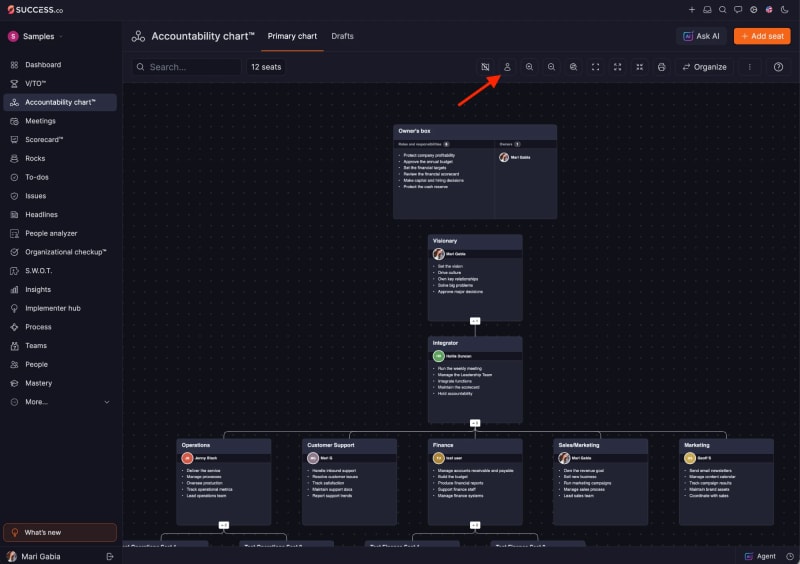
Once you've added an Owner's box, a person icon appears in the toolbar. Click it to hide the Owner's box from the chart, and click it again to show it.
Add an assistant
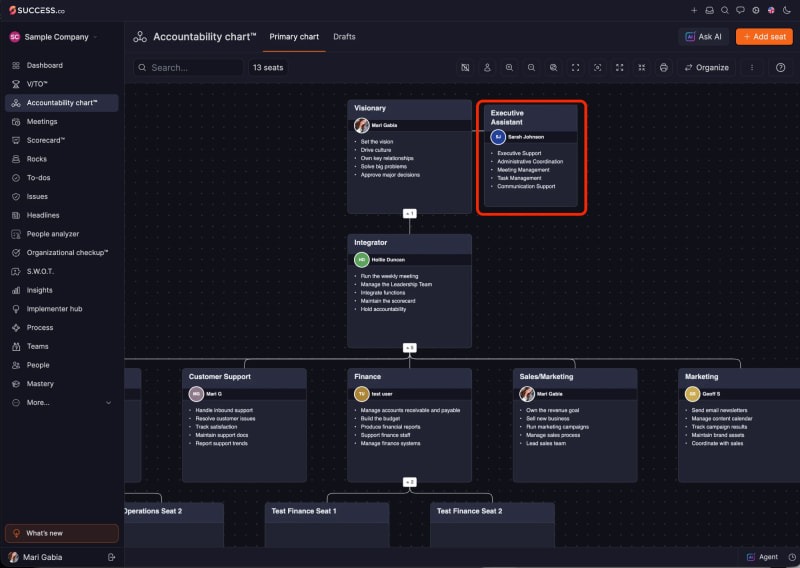
You can add an assistant to a seat, such as an Executive Assistant to the Visionary. The assistant's seat sits beside the seat it supports, rather than below it.
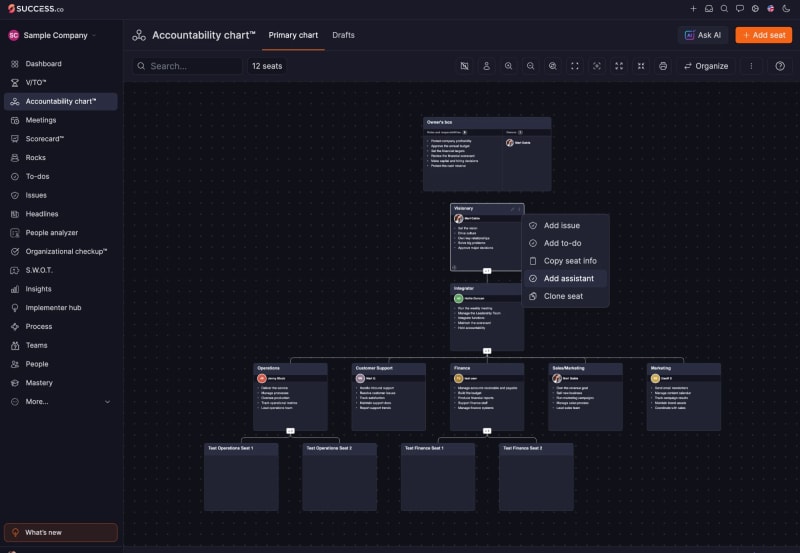
- Hover over the seat and click its three-dot icon.
- Select Add assistant.
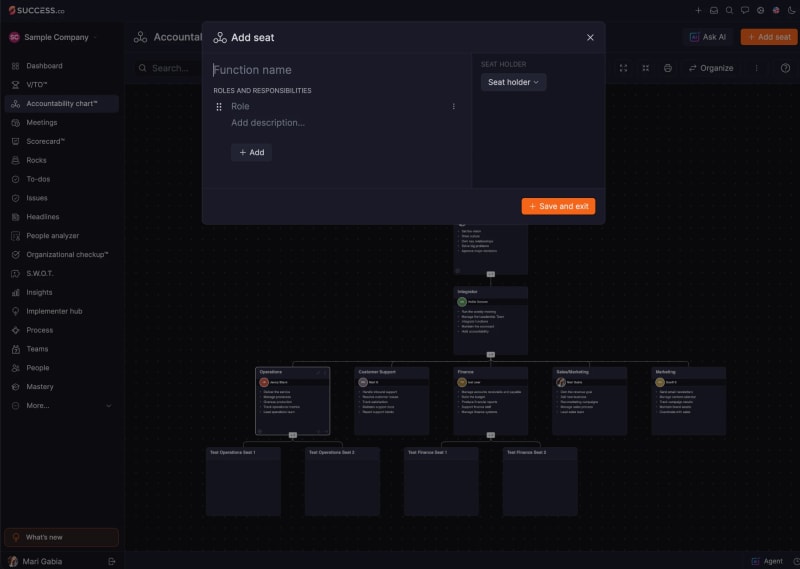
- In the Add seat window, enter the Function name (for example, Executive Assistant).
- Under Roles and Responsibilities, add the assistant's responsibilities. Click + Add to add more.
- Select the Seat holder dropdown and choose who holds the seat.
- Click Save and exit.
The assistant's seat now appears beside the seat it supports.
Delete a seat
- Hover over the seat and click its three-dot icon.
- Select Delete seat.
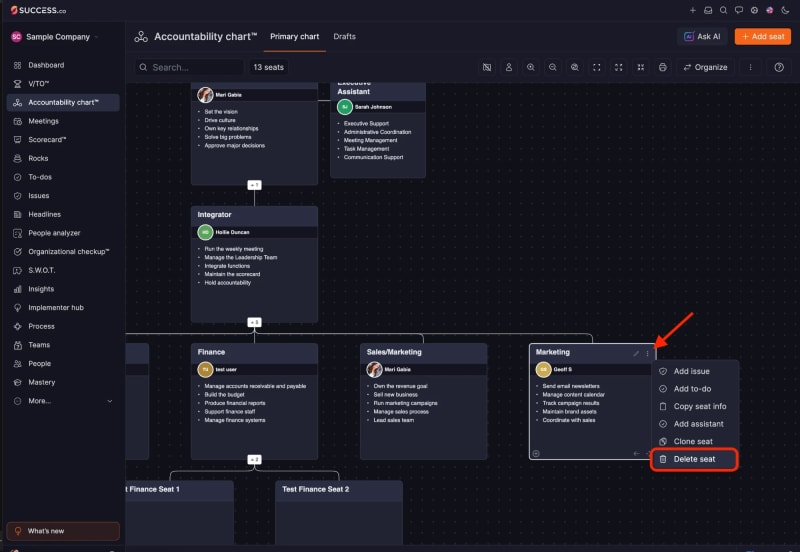
You can delete an Owner's box or an assistant's seat the same way, from its three-dot icon.
Note: Every seat can be deleted except the Visionary seat, because deleting it would delete the entire chart. That's why Delete seat doesn't appear in the Visionary seat's menu.
Seat Details
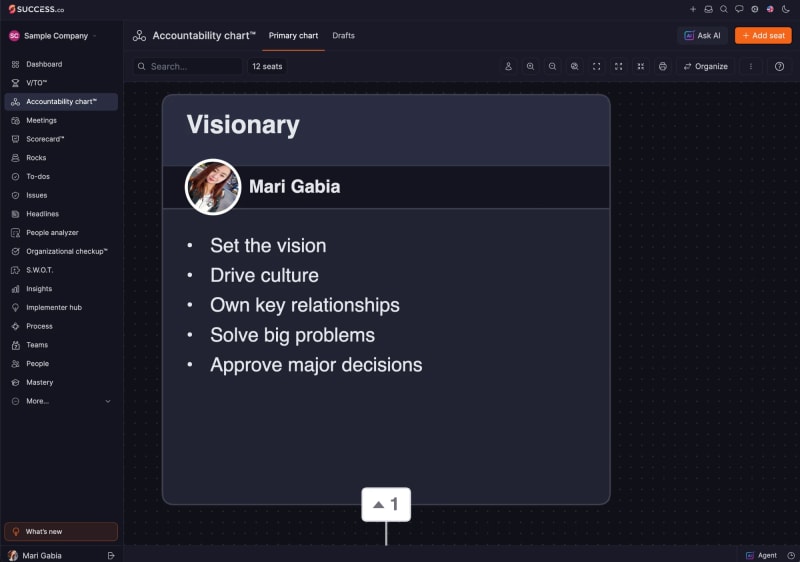
Each seat in the Accountability Chart represents a function or role within your organization, along with its assigned owner and responsibilities. Each box shows:
- The function name (e.g., Integrator, Finance, Operations)
- The seat holder’s name and initials or profile image
- A list of roles and responsibilities
Edit Seat
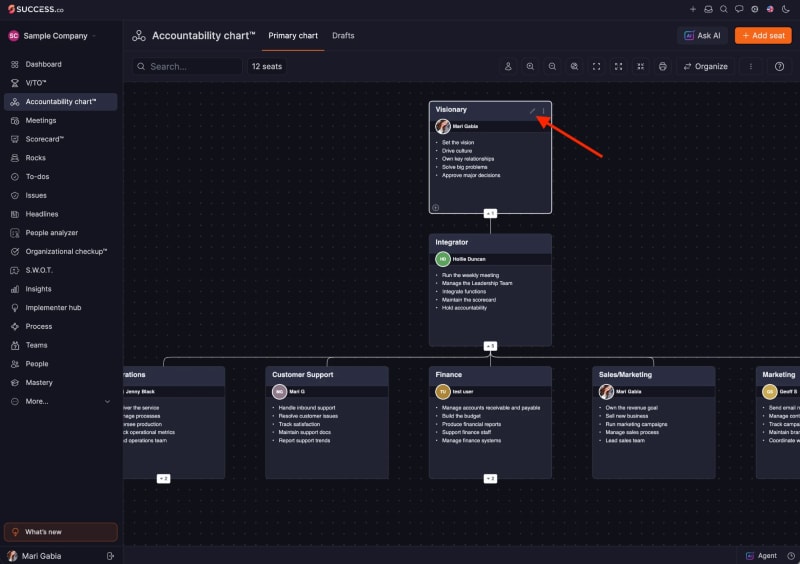
Hover over a seat and select the Pen icon.
Edit a Seat
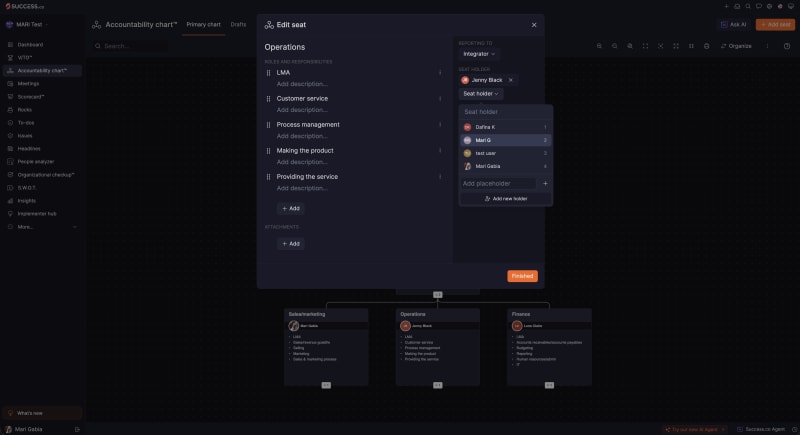
The Edit Seat window allows you to update the structure, responsibilities, and ownership of a seat on the Accountability Chart.
Roles and Responsibilities
Use this section to define what the seat is accountable for.
- Add a role or responsibility: Click + Add and enter the responsibility.
- Add a description: Click Add description... below a responsibility to include additional details.
- Reorder responsibilities: Use the drag handle beside a responsibility to move it up or down the list.
- More options: Click the three-dot menu beside a responsibility for additional actions.
Reporting To
Use the Reporting To dropdown to select which seat this role reports to on the Accountability Chart. Changing this will also update the seat's position within the chart hierarchy.
Seat Holder
The Seat Holder section shows the person currently assigned to the seat.
Attachments
Click + Add under Attachments to add supporting files or resources related to the seat.
Measurables
You can assign Scorecard measurables to a seat, so it's clear which numbers that seat is responsible for.
- Click the pen icon at the top of the seat.
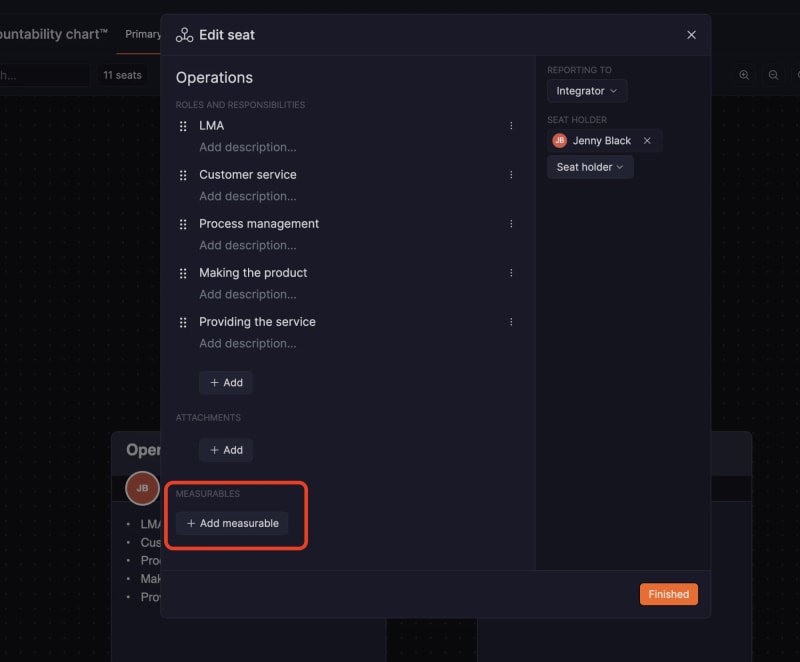
- Scroll down to the Measurables section.
- Click + Add measurable and select the measurable you'd like to assign.
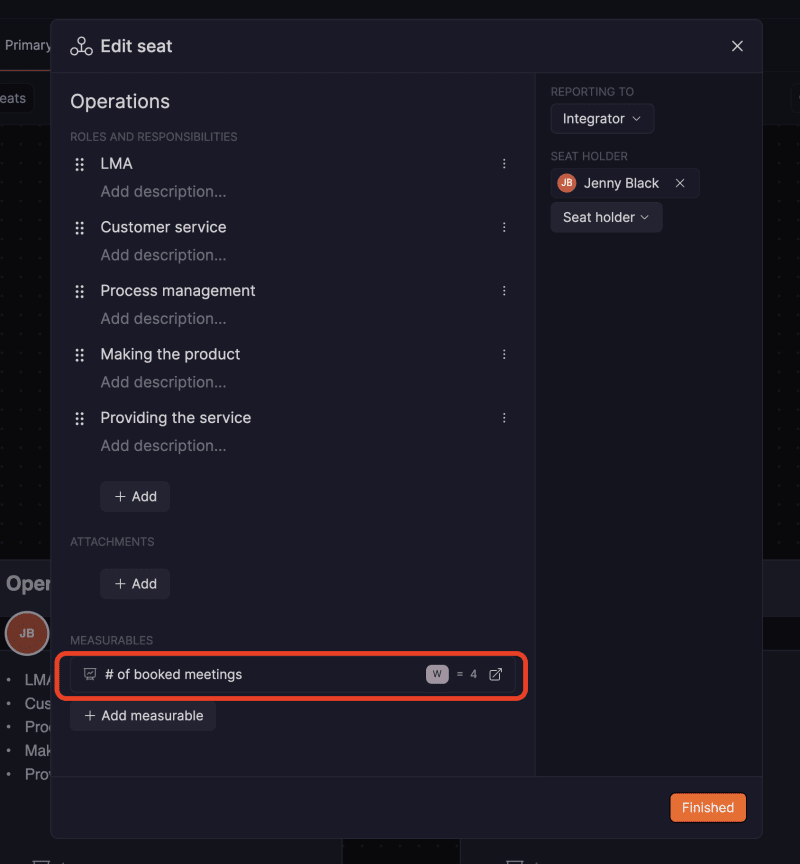
The measurable now appears under Measurables for that seat.
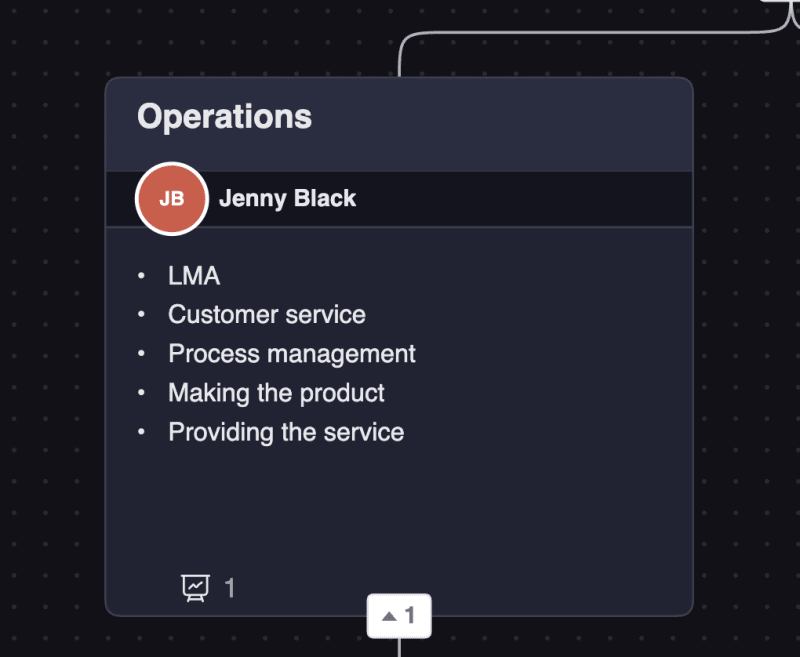
On the chart, a Measurables icon appears at the bottom of the seat, showing how many measurables are assigned to it.
Save Your Changes
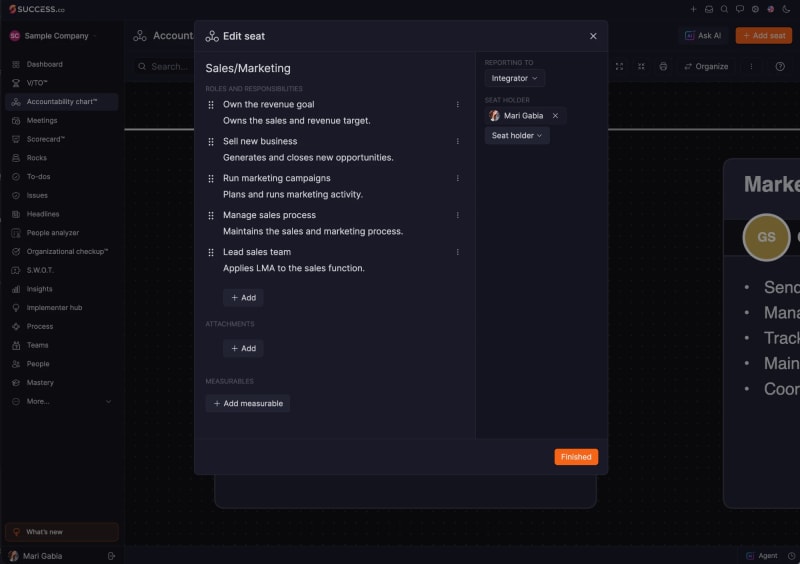
Once you've finished making changes, click Finished. Your updates will be reflected on the Accountability Chart.
Seat Holder
The Seat Holder section allows you to assign and manage the person responsible for the seat.
Click the Seat Holder dropdown to view the available options:
- Select a user: Choose an existing user from the list to assign them to the seat.
- Seat count: The number displayed beside each user's name shows how many seats they currently hold on the Accountability Chart.
- Add placeholder: Enter a placeholder name if you want to assign the seat temporarily without selecting an existing user.
- Add new holder: Select Add new holder to add a new person who is not yet available in the list.
- Remove a seat holder: Click the X beside the current holder's name to remove them from the seat.
You can assign more than one seat holder to a seat if needed.
Seat Actions and Icons
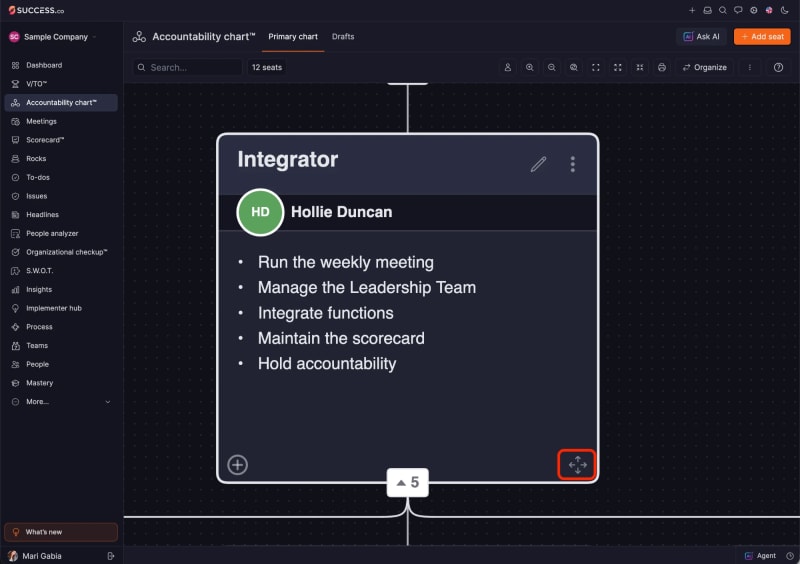
- Edit Seat – Click the pen icon in the top-right corner of the seat to edit its details.
- More Options Menu (three-dot icon) – Add issue, add to-do, copy seat info, add an assistant (see Add an assistant), clone seat or delete seat.
- Change Reporting To (four-arrow icon) – Click the four-arrow icon in the bottom-right corner of the seat to change which seat it reports to (see Change Reporting To from the chart).
- Add a Reporting Seat – Click the plus icon in the bottom-left corner of a seat to add a new seat reporting to that role.
- Measurables icon – Shows how many Scorecard measurables are assigned to the seat (see Measurables).
- Number Badge (white square) – Shows the total number of seats reporting to that role (e.g., 3 means three direct report seats). You can click this to expand or collapse it.
Organizing Your Accountability Chart (Drag & Drop)
Use Organize to rearrange the seats on your chart by dragging and dropping them.
Click the Organize button in the toolbar at the top of the chart.

The chart switches to organize mode, and Drag seats to reorganize the chart appears at the top. The Cancel, Undo, Redo and Done buttons appear on the right.

How to Move Seats
To reorganize your chart:
- Click and hold a seat (box) you want to move
- Drag it to the desired position
- Drop it into place within the chart
Important Behavior
- You can move any seat to any position on the chart, at any level.
- Each seat reports to one seat at a time.
- You cannot move a seat above the top seat of the chart (usually the Visionary).
This keeps the structure clear and every reporting relationship intact.
Adjusting Reporting Structure
When you move a seat:
- Its Reporting To updates to the seat you dropped it under
- Any seats reporting to it move along with it
Undo or Redo Changes
While in Organize mode, you can:
- Click Undo to revert your last change
- Click Redo to reapply a change
Once you’re done organizing, click Done to save your changes, or click Cancel to exit without saving.
Change Reporting To from the chart
To change which seat a seat reports to without opening the full Edit seat window:
- Click the four-arrow icon in the bottom-right corner of the seat. The Reporting to pop-up appears.
- Use the Reporting To dropdown to select the seat it should report to.
- Click Finished to save your changes.

Overview panel
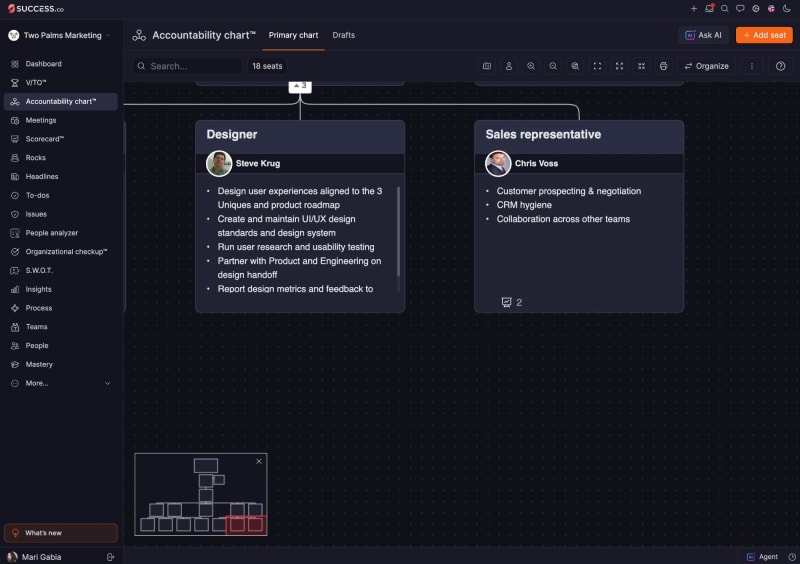
The overview panel is a small map of your whole Accountability Chart. It shows which part of the chart you're looking at, and lets you jump to any other part. It's especially helpful on bigger charts.
Turn the overview panel on or off
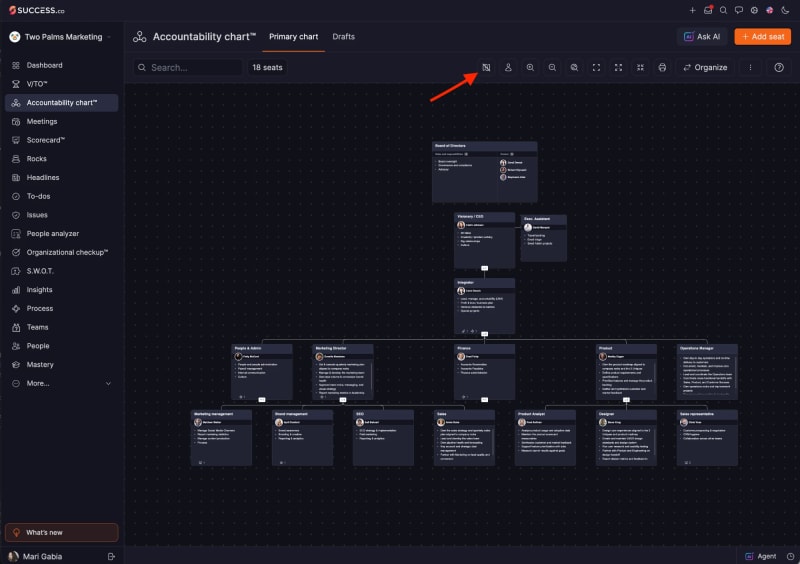
Click the map icon (Toggle Overview Panel) in the toolbar at the top of the chart. Click it again to turn the panel off.
Note: The overview panel is only available on bigger charts, with at least 5 rows of seats. On smaller charts, the Toggle Overview Panel icon doesn't appear in the toolbar.
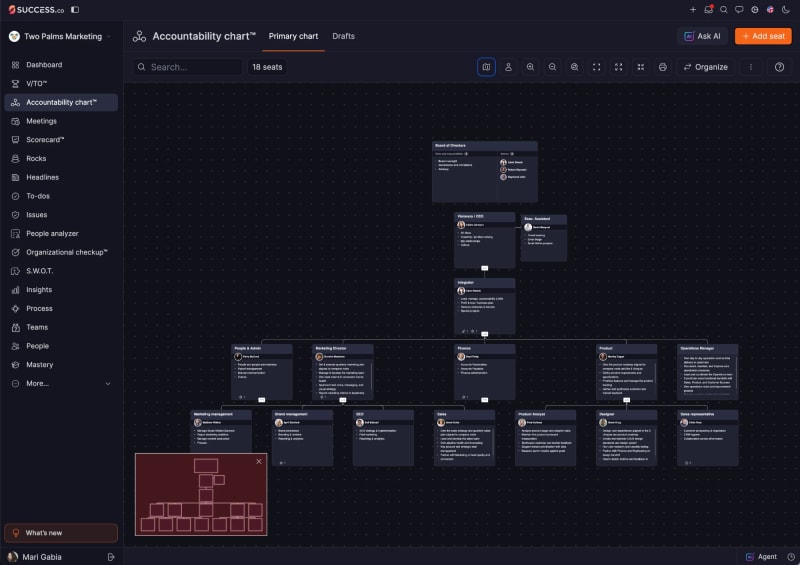
When it's on, the overview panel appears in the bottom-left corner of the chart, showing every seat as a small box.
Use the overview panel
- See where you are: as you zoom in and move around the chart, the part you're looking at is highlighted on the overview panel.
- Jump to another part: click any area of the overview panel to go straight to that part of the chart.
- Close it: click the X in the top-right corner of the panel.
Draft section
In the draft section, you will see your primary chart and draft charts. You can also click on the Add chart button to add a new accountability chart.

When you select the 3 dot icon next to the Primary chart, you'll get an option to:
Edit – change the chart name/title and add a description.
Make a copy – Creates a duplicate of the chart.
Export CSV – Downloads the chart data in CSV format.

While selecting the 3 dot icon next to a Draft chart will provide you options to:
Edit – change the chart name/title, add a description, and share chart to a user
Make a copy – Creates a duplicate of the chart.
Set as primary – Marks this chart as the main view.
Delete – Permanently removes the chart.
Export CSV – Downloads the chart data in CSV format.

On a draft chart, selecting Edit also gives you the option to share the chart with one or more users. Hover over Share Chart and click the Add Users button to grant access. Click the Finish button to save changes.

Import data
You can import data for your Accountability Chart in CSV format by clicking the upload button.
In the Import CSV file window, drag and drop your CSV file, or click to select it, then click Import CSV file. To see how the file should be laid out, click Download sample file.

Export data
You can also export your Primary Chart in CSV format by clicking the download button at the top right of the screen.

Primary Chart
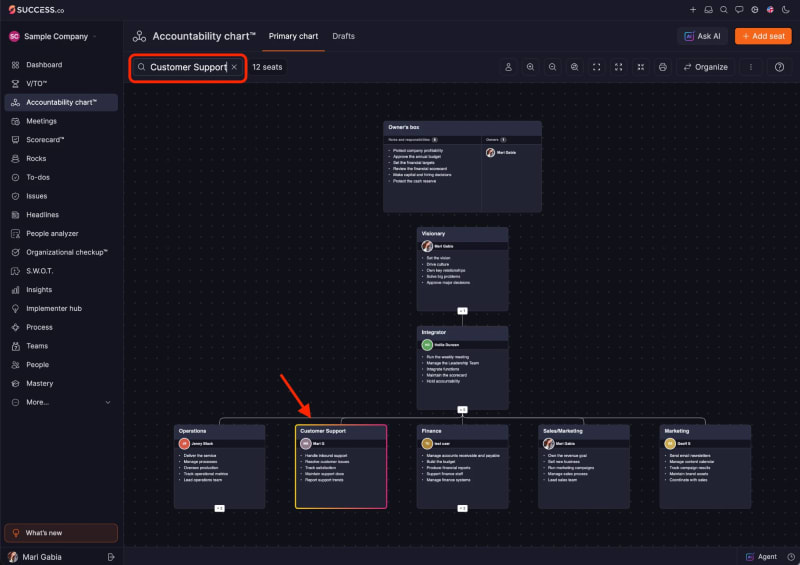
You can search for a seat by typing the Function Name into the search bar. The matching seat is highlighted on the chart.
On the upper right-hand side of the Primary Chart, you'll see the following icons:
- Toggle Overview Panel – Show or hide the overview panel, a small map of the whole chart (see Overview panel)
- Show/Hide Owner's Box – Show or hide the Owner's box (see Owner's box)
- Zoom In – Increase the chart view size
- Zoom Out – Decrease the chart view size
- Reset Zoom – Return the chart to its default view size
- Full Screen – Expand the chart to fill the entire screen; to exit full screen, click the X icon on the upper right side of the screen.
- Center Selected/Deselect - Automatically centers the chart view on the currently selected role or box.
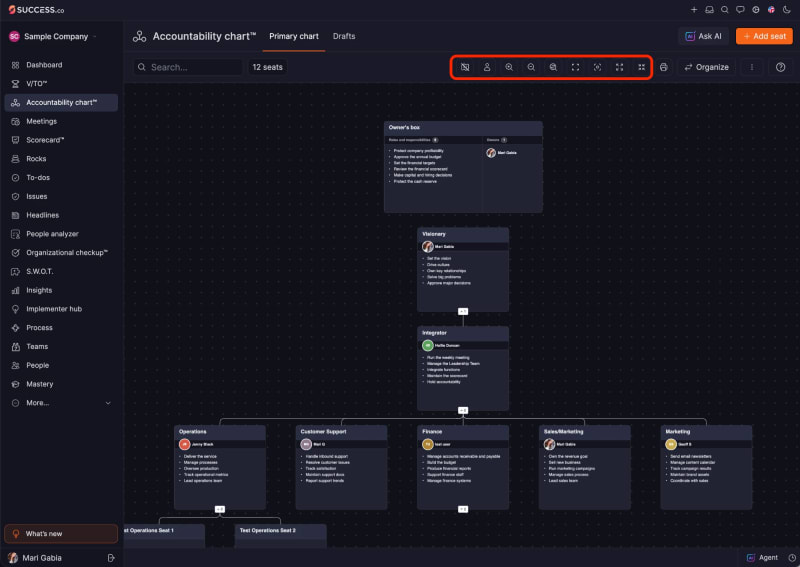
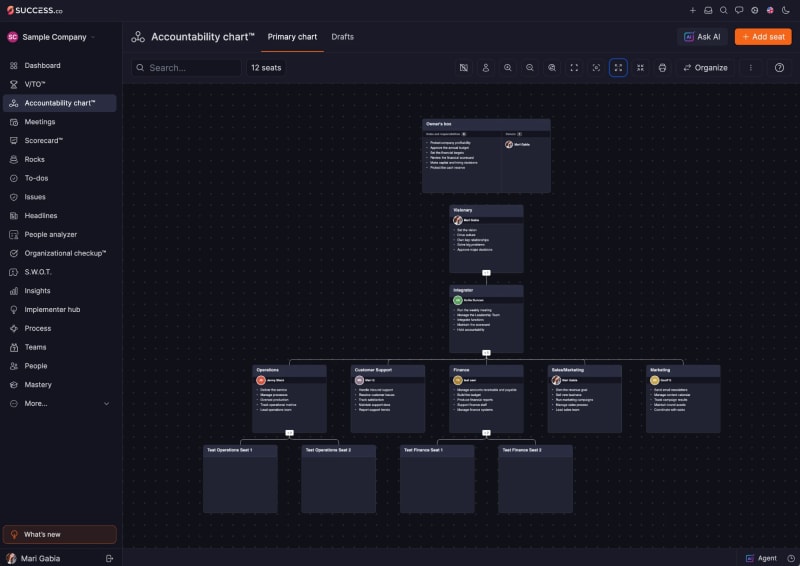
- Expand All – Show all levels of the chart
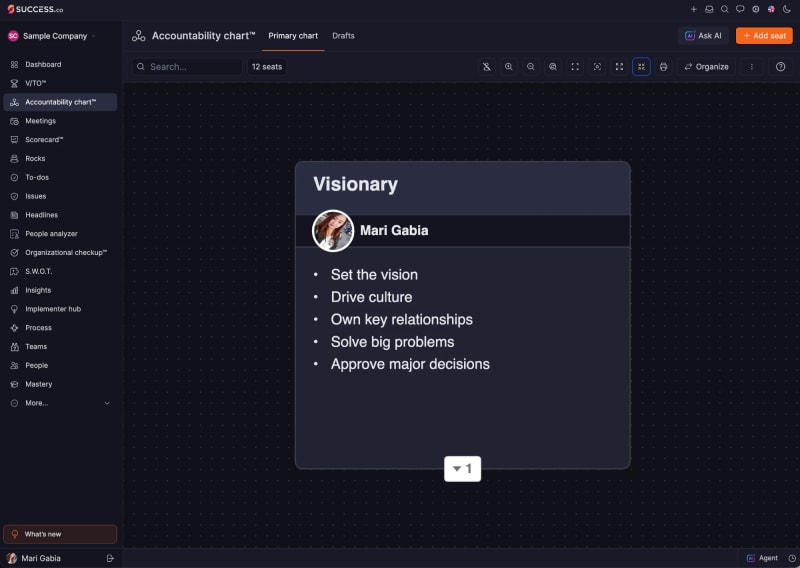
- Collapse All – Hide all sub-levels, showing only top-level seat/s.
Export PDF
You can export the Primary Chart in PDF format by clicking the Print icon in the upper right corner of the chart. Choose how you'd like it laid out:
- Single page – The whole chart on one page.
- Multiple page – The chart split across several pages.
- Leadership team – Only the leadership team: the chart down to the seats that report directly to the Integrator (for example, Operations and Finance). The seats below them aren't included.
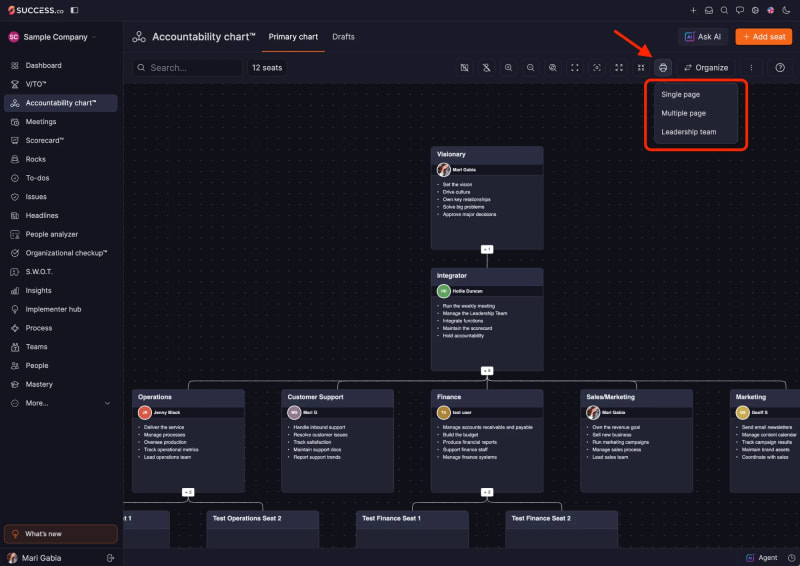
Once you select your preferred layout, a pop-up window will display a preview of the PDF. Click the Download icon at the top to save the file, or click the Print icon to print it directly.
